Service Businesses: GTM Conversion Tracking, No Server Side Needed
Service Businesses: GTM Conversion Tracking, No Server Side Needed

Use Google Ads conversion actions deployed through Google Tag Manager with enhanced conversions turned on as your baseline. That combination covers most small business needs on its own. Add a server-side GTM container only when site speed or data accuracy demands it. The rest of this guide walks through choosing a setup method, building conversion actions in Google Ads, wiring up GTM, and verifying everything actually fires before you trust the numbers.
TL;DR:
- Using Google Ads conversion actions via Google Tag Manager with enhanced conversions covers most small business needs without additional server-side setup.
- URL-based tracking is fast but less reliable, while code-based and GA4 import options provide more precise data, especially for transaction values.
- Proper implementation requires correct permissions, consistent naming, and thorough testing in GTM’s preview mode before going live.
- Enhanced conversions improve attribution accuracy by hashing customer data like emails, but require verification through network requests with specific parameters.
- Server-side GTM offers speed and privacy benefits but is generally unnecessary unless site speed issues or significant data inaccuracies are evident.
Table of Contents
- How Conversion Tracking Works: Choosing a Setup Method
- Create Conversion Actions in Google Ads (Step-by-Step)
- Implement Conversion Tags With Google Tag Manager
- Enhanced Conversions: Methods, Trade-Offs, and Verification
- Server-Side Tag Manager: When to Upgrade and How to Set It Up
- Verify and Debug Conversions: Tools and a Pre-Launch Checklist
- Assigning Conversion Values and Tracking Offline Conversions
- Practitioner Notes From Moderatemurmurations
- Handling Conversions Across Multiple Domains and Subdomains
- Attribution Models and Why the Choice Changes Your Reporting
- Why We Recommend Layering Accuracy Over Chasing Perfection
- Get Your Conversion Tracking Setup Built and Verified
- Sources
- FAQ
How Conversion Tracking Works: Choosing a Setup Method
Conversion tracking setup starts with one decision: how will Google Ads learn that a conversion happened? You have three realistic paths, and picking the wrong one is the most common reason small business owners end up with broken or misleading reports.
URL-based tracking fires the moment a specific page loads, usually a “thank you” or confirmation page. It’s the fastest option to configure and works well for simple lead forms or checkout confirmations where nothing dynamic needs to be captured. The catch: it only tells you a page loaded, not what happened on it. If someone bookmarks or reloads your thank-you page, you can inflate your numbers without realizing it.
Code or event-based tracking fires on a specific action, like a button click, form submission, or completed purchase, and it can carry custom data such as transaction value or order ID. Google Ads documents both approaches as the primary web conversion measurement methods, and code-based tracking is the one you need whenever a dollar value or transaction ID matters to your reporting.
Importing from GA4 makes sense if you already manage event tracking inside Google Analytics 4 and don’t want to duplicate tag logic in two places. You mark an event as a key event in GA4, then import it into Google Ads as a conversion action rather than building a separate tag.
Before any of this works, permissions have to be in order:
- Admin access on the Google Ads account you’re configuring
- Editor access on the connected GA4 property
- A confirmed account link between Google Ads and GA4 if you plan to import events
Skip the linking step and GA4 imports simply won’t appear as an option, which is a support ticket Moderatemurmurations sees constantly from business owners who assumed the accounts talked to each other automatically.
Create Conversion Actions in Google Ads (Step-by-Step)
Every conversion tracking setup in Google Ads starts in the same place: Tools & Settings → Measurement → Conversions. You’ll need admin or standard access with edit rights on the account; read-only users can view conversion data but can’t create new actions.
From there, follow this sequence:
- Click the plus button to start a new conversion action and choose your source: Website, App, Phone Calls, Import, or Google Analytics.
- Pick a category that matches the real business action, purchase, lead, sign-up, page view, or a custom category. This affects how Google Ads groups and reports the conversion, and it also feeds into Smart Bidding, so a mislabeled category can quietly skew optimization.
- Choose a counting method. “One” counts a single conversion per ad click regardless of how many times the action repeats, ideal for lead generation. “Every” counts each instance, which fits ecommerce where a customer might buy multiple times.
- Set a value and currency. You can assign a fixed dollar value, use different values per action, or leave it dynamic to be filled in by code later. More on this in the values section below.
- Select your setup method. Google Ads gives you four options here: the Google tag, Google Tag Manager, URL-only (no code), or importing from Google Analytics 4. This choice determines everything about the implementation steps that follow.
If you’re already tracking meaningful events in GA4, marking those as key events and bulk-creating Google Ads conversions from GA4 events can save real setup time. Instead of building four separate tags for four separate goals, you import four ready-made conversion actions in a couple of clicks, according to Google’s documentation on web conversion setup.
Pro Tip: Name your conversion actions with a consistent pattern from day one, something like “Lead - Contact Form - Website” rather than just “Conversion 1.” Six months from now, when you have a dozen conversion actions and a client asking which ones feed which campaign, you’ll thank yourself.
One decision worth pausing on: don’t create a new conversion action for every micro-interaction on your site. A newsletter signup and a $5,000 consulting inquiry should never share equal weight in your bidding strategy. Reserve primary conversion status for actions that reflect real business value, and mark smaller signals as secondary so Smart Bidding doesn’t chase the wrong goal.
Implement Conversion Tags With Google Tag Manager
If you chose Google Tag Manager as your setup method, this is where the actual wiring happens. GTM gives you a layer of control that raw website code doesn’t, letting you publish, test, and roll back changes without touching your site’s codebase.
- Install a Conversion Linker tag first, set to fire on all pages. This tag reads the ad click identifier (GCLID) from the landing page URL and stores it in a first-party cookie, which is what lets Google Ads connect a later conversion back to the original ad click. Google explicitly recommends this tag as part of reliable conversion tracking setups, and skipping it is one of the most common reasons conversions silently disappear from reporting.
- Create your Google Ads Conversion Tracking tag. You’ll need your Conversion ID and Conversion Label, both found on the conversion action you built in Google Ads. Paste them into the GTM tag configuration exactly as shown; a single mistyped character here breaks the entire connection.
- Choose the right trigger. Your options include a URL match trigger (fires when a thank-you page loads), a custom dataLayer event trigger (fires when your website pushes a specific event, like
form_submit), or a native click/form submission trigger built into GTM. DataLayer events tend to be the most reliable for anything beyond a simple page load, because they fire based on an actual action rather than a URL pattern that might change. - Pass dynamic values using GTM variables. If a transaction has a real dollar value, or you need a unique transaction ID for deduplication, set up Data Layer Variables in GTM that pull those values from your site’s dataLayer and map them into the conversion tag’s value and transaction ID fields.
- Test in Preview mode before publishing. GTM’s preview pane shows you exactly which tags fired on which page, in what order, which catches most configuration mistakes before they ever reach a live visitor.
Pro Tip: Keep a dedicated GTM workspace for conversion tracking changes separate from your analytics or marketing pixel workspace. It makes rollbacks faster and keeps a messy publish from breaking three unrelated tags at once.
Before you hit publish for real, run through a short checklist: correct Conversion ID and Label, trigger fires only where intended, Conversion Linker is active site-wide, and variable values populate correctly in Preview mode. That five-minute check saves hours of confused reporting later.
Enhanced Conversions: Methods, Trade-Offs, and Verification
Enhanced conversions supplement your existing conversion tag by securely sending hashed first-party customer data, most commonly an email address, back to Google to close attribution gaps that cookie restrictions and ad blockers create. Google describes this method as layering on top of, not replacing, your standard conversion tag.
The hashing matters here. Enhanced conversions use SHA256 to convert raw customer data into an irreversible string before it ever leaves the browser or server, so Google Ads never receives a plain-text email address. Email tends to be the preferred field because it hashes consistently and matches well across devices, though phone number and address fields work too.
You have three implementation choices, each with a real trade-off:
- Automatic detection lets Google’s tag scan your page for common field names (email, phone) and hash them without any manual mapping. It’s the fastest option but depends on your form using recognizable field structures.
- CSS selector mapping tells the tag exactly which page element holds the customer’s email or phone, useful when automatic detection misses a custom-built form.
- Code snippet implementation lets you pass either pre-hashed or unhashed data directly into the tag’s configuration, giving you full control but requiring development work to hash the data correctly if you handle it yourself.
To turn this on inside Google Ads, go to your conversion action’s settings and enable enhanced conversions, then choose your implementation method and map the relevant page fields.
For advertisers who collect a customer email on their conversion page, enabling this is one of the highest-impact upgrades available for recovering conversions that browser privacy restrictions would otherwise hide from reporting.
To verify it’s actually working, open your browser’s network tab, complete a test conversion, and look for a request to googleadservices or a pagead/conversion endpoint. Inside that request’s parameters, you should see an em parameter, a hashed string representing the email data. No em parameter means the hashing step never ran, and that’s worth catching before you assume the upgrade is live.
Server-Side Tag Manager: When to Upgrade and How to Set It Up
Server-side GTM moves your tag processing from the visitor’s browser to a server you control, and it’s worth considering once client-side tracking starts showing cracks. Google’s developer documentation confirms the main benefits: faster page load since fewer scripts run in the browser, fewer tags blocked by ad blockers or browser privacy settings, and tighter control over exactly what data leaves your server.
Before you commit, make sure you actually have the prerequisites:
- Admin rights on both Google Ads and your GTM account
- An existing web container (your current client-side GTM setup)
- A server container, which requires hosting, either through Google Cloud or a managed tagging service
- A configured GA4 client running inside that server container
The high-level build sequence looks like this: set up a Conversion Linker tag inside the server container, define a GA4 key event that represents your conversion, add a Google Ads Conversion Tracking tag to the server container, and map the variables (value, transaction ID, hashed customer data) so they flow from the client container through to the server side correctly, per Google’s server-side ads setup guide. One underused capability here: server-side containers can pull real price or profit values directly from a backend database, like Firestore, and assign them to a conversion through a user-defined variable, which is far more accurate than hardcoding a static value in the browser.
Pro Tip: Don’t rebuild your entire tracking stack server-side on day one. Migrate the Ads conversion tag first, confirm it reports cleanly for two full weeks, then move additional tags over one at a time.
For a small static site running a handful of ads a month, server-side GTM is usually overkill. The hosting cost and ongoing maintenance rarely pay for themselves until you’re running enough ad spend that a few percentage points of tracking accuracy translate into real budget decisions. Industry practice for 2026 increasingly treats this as a layered approach: client-side for real-time responsiveness, server-side for the reliability layer underneath it, not an either-or choice.
Verify and Debug Conversions: Tools and a Pre-Launch Checklist
A conversion tag that “should” be firing and one that’s actually firing are two different things, and the gap between them is where most tracking problems live. Run through this sequence before you trust any number in your Google Ads dashboard:
- Preview your GTM container and walk through the exact user path a real visitor would take, from ad click to conversion.
- Install Tag Assistant and confirm the Conversion Linker and Ads Conversion tag both show as fired, in the right order, on the right page.
- Open GA4 DebugView if you’re importing key events, and confirm the event appears with the parameters you expect attached.
- Use the GTM Trigger debugger to catch a trigger that’s firing on the wrong page or not firing at all.
- Check the network tab for requests to
googleadservicesorpagead/conversion, and confirm the parameters (value, transaction ID,emfor enhanced conversions) are all populated correctly.
Four issues cause the majority of small business tracking failures:
- GCLID loss, usually because the Conversion Linker tag isn’t installed site-wide or isn’t firing before the user navigates away
- Cross-domain tracking gaps, common when a checkout or booking flow lives on a different domain or subdomain than the marketing site
- Wrong trigger configuration, where a tag is bound to a URL that later changes, silently breaking the trigger
- Blocked cookies, from browser privacy settings or consent tools that prevent first-party cookies from storing the GCLID
Google Ads typically needs a few hours to a day to start showing new conversion data in reporting, and a conversion action’s status will read “Recording conversions” once it has confirmed data flowing in; anything still showing “No recent conversions” after 24 to 48 hours needs another look at the checklist above.
Assigning Conversion Values and Tracking Offline Conversions
Not every lead is worth the same amount, and treating them that way in Google Ads misleads your bidding algorithm from day one.
Static values work fine when your offerings are priced uniformly, a $200 consultation call regardless of who books it, for instance. Dynamic values, passed through a transaction ID and pulled from your actual order or booking data, matter once your services vary in price, since a $5,000 project and a $500 project shouldn’t count as identical conversions. Details on connecting conversion values to real business economics appear in a guide on how consultant websites convert clients, which covers the value side of this problem in more depth.
For service businesses, plenty of real revenue happens off the website entirely, a phone call that becomes a signed contract weeks later, for example. That’s where offline conversion imports come in: you export completed deal data from your CRM, matched to the original GCLID or a transaction ID captured at lead time, and upload it back into Google Ads.
A few practices keep this reliable:
- Use consistent, unique IDs across your CRM and website so records match cleanly on import
- Deduplicate before uploading; double-counted conversions inflate your reported return and mislead Smart Bidding
- Include conversion time, value, and currency on every import, since incomplete records get rejected or misattributed
Feeding real closed-deal data back into Google Ads, rather than treating a form submission as the finish line, gives automated bidding the information it needs to chase leads that actually become revenue instead of leads that merely fill out a form.
Practitioner Notes From Moderatemurmurations
Working through conversion tracking setups for small service businesses, a few patterns show up again and again. Access problems cause more delays than technical ones: before touching a single tag, confirm you have admin rights on Google Ads, editor access on GA4, and a test account or incognito browser ready for QA. Naming dataLayer variables consistently (event, transaction_id, value) across every page template prevents the mapping headaches that eat up hours later. The most common small-business gotcha isn’t a broken tag. It’s a form plugin that changes its field names after an update, quietly breaking automatic enhanced conversions detection until someone notices the numbers look wrong.
Handling Conversions Across Multiple Domains and Subdomains
If your booking system, checkout, or client portal lives on a different domain than your main marketing site, standard conversion tracking setup breaks unless you account for the handoff. Cookies are domain-specific by default, so a GCLID stored on yoursite.com doesn’t automatically travel with a visitor to booking.yoursite.com or a third-party checkout domain.
Subdomains are the easier case. If your booking tool sits on a subdomain of your main domain, first-party cookies set at the root domain level (rather than scoped to a single subdomain) generally carry over without extra configuration, as long as your Conversion Linker tag is installed on both properties.
Cross-domain tracking, where the second domain is entirely separate, needs deliberate setup. Google Tag Manager’s cross-domain linking passes click identifiers as URL parameters between domains, and both domains need the Conversion Linker tag installed and configured to recognize each other as part of the same customer journey. Skip this step and every visitor who moves from your marketing site to a separate checkout domain shows up as a brand-new, untracked session, which quietly erases a chunk of your real conversions from reporting.
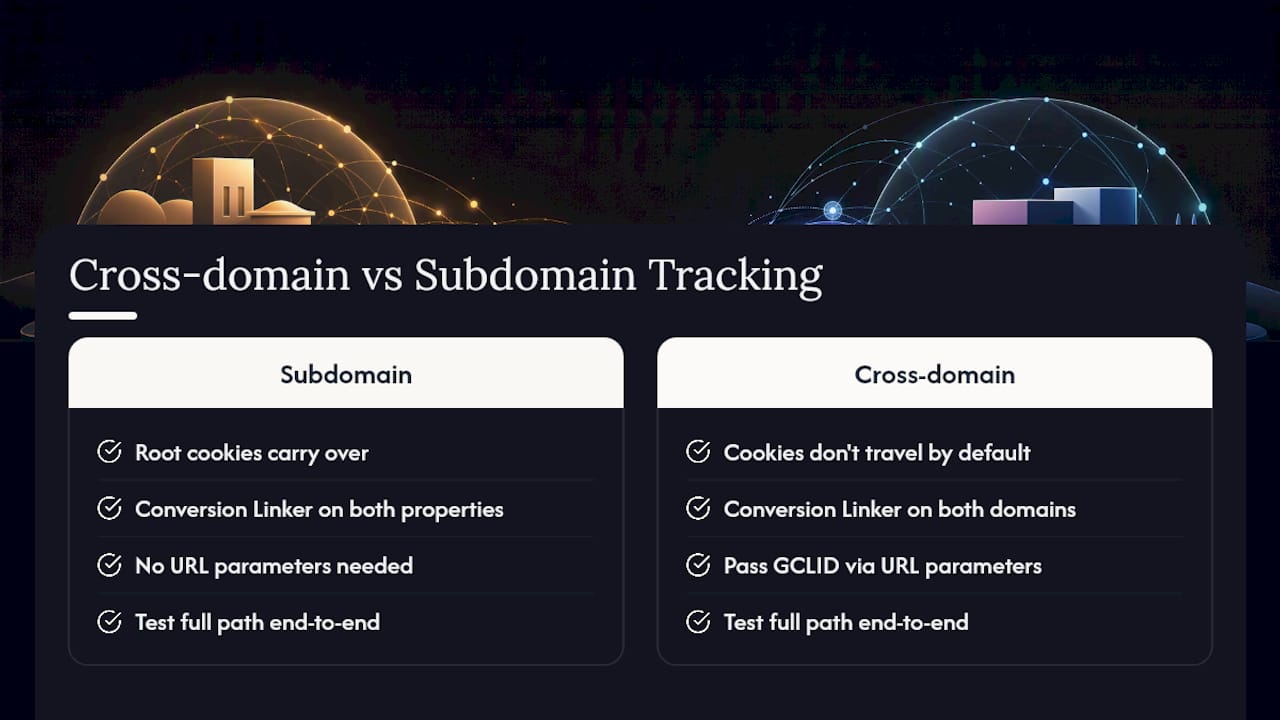
The practical fix: list every domain and subdomain involved in your conversion path before you build anything, then configure cross-domain linking in GTM to include all of them. Test the full path end to end, not just the final page, since a broken handoff two steps before conversion is just as damaging as no tracking at all.
Attribution Models and Why the Choice Changes Your Reporting
Attribution models decide how credit for a conversion gets split across the touchpoints that led to it, and the model you pick can make the same conversion data tell two completely different stories.
Google Ads has moved most advertisers toward data-driven attribution, which uses your account’s own conversion patterns to assign credit across touchpoints based on what actually influenced outcomes, rather than following a fixed rule. It’s generally the most accurate option when your account has enough conversion volume for the model to learn from.
Rule-based alternatives still exist and matter for understanding what data-driven attribution replaced. Last-click attribution gives 100% of the credit to the final ad interaction before conversion, simple to understand but blind to everything that happened earlier in the customer’s research. First-click does the opposite, crediting the interaction that started the journey. Linear attribution splits credit evenly across every touchpoint, and time-decay weights recent interactions more heavily than earlier ones.
For a small business running one or two campaigns with a straightforward path to conversion, the model matters less. For a business running search, display, and remarketing simultaneously, the difference between last-click and data-driven attribution can shift which campaign appears to be “winning” by a wide margin, which directly affects where you decide to put next month’s budget. Check your attribution setting under conversion action settings in Google Ads before drawing conclusions from a performance report; the wrong model can make an underperforming campaign look great and a genuinely strong one look weak.
Why We Recommend Layering Accuracy Over Chasing Perfection
Most small businesses don’t need server-side tracking on day one, and building it prematurely just adds a maintenance bill for a marginal accuracy gain you can’t yet use. Get GTM and enhanced conversions running cleanly first, verify the data for a few weeks, and only add a server-side container once you can point to a specific gap it would fix, cookie loss, page speed, or reporting inconsistency you can prove. Cost and upkeep are real factors, not afterthoughts, and matching setup complexity to actual ad spend keeps the investment proportional. If you want a second opinion on where your setup currently stands, consider seeking a short audit built around exactly that question.
— Christopher
Get Your Conversion Tracking Setup Built and Verified
Professional providers can handle the technical build so you’re not the one debugging dataLayer variables late before a campaign launch. Services often cover full GTM setup, enhanced conversions implementation, an optional server-side container when traffic justifies it, and audits to flag what’s broken or missing in current tracking.

Every engagement ends with a prioritized fix list, so you know what to address first and what can wait. If your website already exists but the tracking underneath it has never been properly wired, that’s a common starting point for the audit. If you’re launching new, we build the tracking into the site from day one instead of patching it in later. Book a free consultation with Moderatemurmurations to get a conversion tracking setup that actually holds up under real traffic.
Sources
- Set up your web conversions - Google Ads Help
- Google Ads conversions | Tag Manager server-side ads setup - Google Developers
FAQ
When Should I Use Conversion Tracking?
Set up conversion tracking as soon as you launch a paid campaign, since even a small ad budget without tracking gives you no way to know which clicks turned into leads or sales.
How Do I Set Up Conversion Tracking for App Downloads?
Create an app conversion action in Google Ads under the “App” source option, then link your Google Play or Apple App Store account, or use Firebase or a third-party mobile measurement partner to pass install and in-app events back to Ads.
How Do I Set Up Conversion Tracking on Facebook Ads?
Facebook conversion tracking runs through the Meta Pixel or Conversions API rather than Google Tag Manager’s Ads tags, so it requires a separate pixel installation and event setup inside Meta Events Manager, distinct from the Google Ads workflow this guide covers.
How Do You Track Conversions Overall?
Track conversions by creating a conversion action in Google Ads, deploying the corresponding tag through Google Tag Manager with a Conversion Linker installed, and verifying the data with Tag Assistant and GA4 DebugView before trusting the reports.
Do I Need Server-Side GTM to Track Conversions Accurately?
No. A properly configured client-side GTM setup with enhanced conversions handles accurate tracking for most small businesses; server-side GTM is an upgrade worth considering only once site speed or cookie loss becomes a measurable problem.